
Configurations in SOLIDWORKS parts and assemblies give you the ability to vary dimensions and control the suppression states of various features without needing to create a new document. This allows you to have multiple variations of one project within one file.
Design Tables in SOLIDWORKS
Most Commonly used example is a washer; a washer is a simple component which comes in numerous sizes but the features used to create it will typically be the same. You can certainly have an individual part file for each size of washer or you can have one part file called “washer” which uses configurations to include all sizes. You can then choose which configuration you want to use as it is inserted into an assembly.
This can be very useful, but depending on how many configurations are in use, managing them can become difficult. So in place of manually activating each configuration and then adjusting their details we can implement SOLIDWORKS Design Tables, which will tabulate all relevant information into an easy to use Excel spreadsheet.
To have a clear idea for using a Design Table in SOLIDWORKS, it is a good practice to name the features and dimensions, so they are easily recognizable from a distance.
Features can be renamed by double clicking on them in the Feature Tree, or select the feature and press F2 on your keyboard.
Sketch dimensions can also be renamed via their Modify dialogue.

To create a Design Table you will go to Insert > Tables > Design Table. Here you may create a blank table, auto-create a table based on dimensions and features which already vary per configuration, or link the Design Table to an external Excel spreadsheet file.
In this example, I will be choosing the “Blank” option so I can pick and choose which items I would like to import into the table. I will then select which configurations, dimensions, features, and properties I would like to populate into the table.
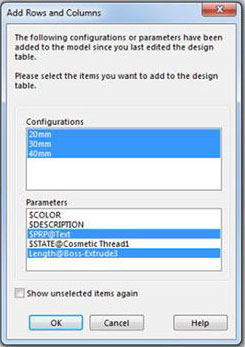
Now that my table has been generated I can add additional configurations by filling in the row and relevant cells.
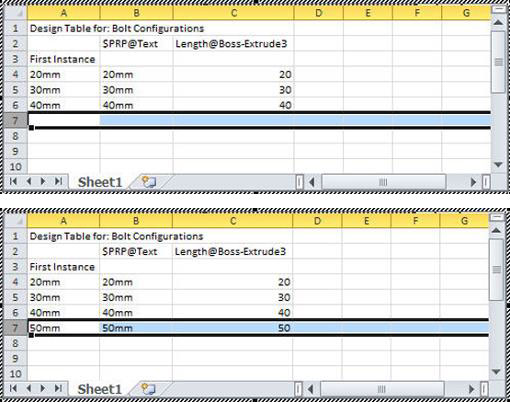
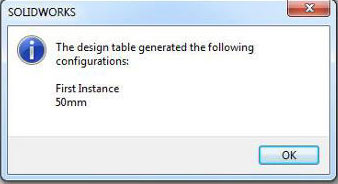
Next, I will left click in the graphics window, the table closes automatically, and the new configuration is created for me.
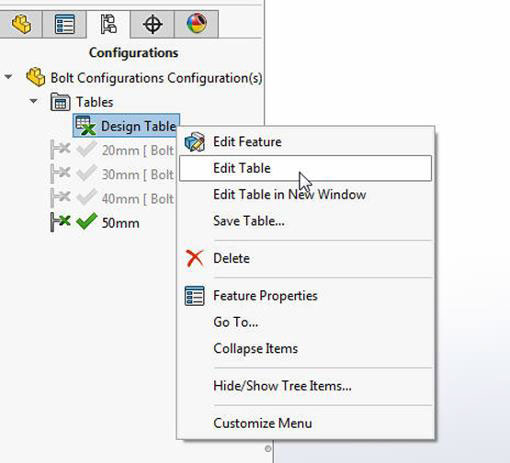
Since the table has been created I can locate and modify it under the Tables folder on the Configurations tab.
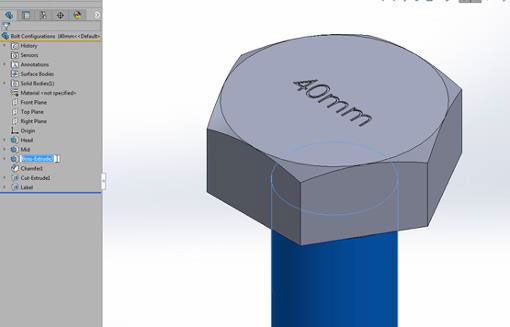
Back in the table, I want to control the suppression state of the engraved text. I can add this feature as a column by simply double clicking it in the Feature Tree. You can also add dimensions as columns by double clicking them while they are visible.
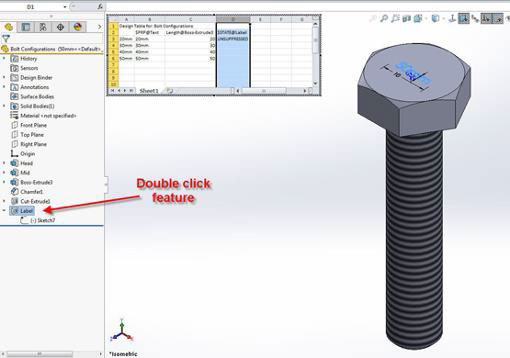
From here I will fill in the cells in this column as needed. You can use the text [Unsuppress, U, 1] or [Suppress, S, 0] to control the suppression state of features in the table.