Learn how customizing project templates can help electrical work move quicker while staying neat, and consistent in SOLIDWORKS Electrical.
SOLIDWORKS Electrical templates are handy for creating a standardized workflow across an organization, using SOLIDWORKS Electrical. By using consistent settings, title blocks, and reporting rules, teams can work inside one shared project-wide structural framework. But in real life, companies sometimes want to push new Standards, and these changes should be applied to the project templates that are already in place, and to start from nothing every time.
To prevent building a template from a clean slate, and avoid creating a totally new project template each time, SOLIDWORKS Electrical gives users the option to customize and expand existing templates. This means the result still matches organizational expectations and actual needs.
In this blog, we’ll cover why editing project templates matters, and how to do it efficiently without getting stuck in endless menus.
Why Modify Project Templates?
Over time, organizations often need to update project templates for a handful of reasons, like:
• Company logo or title block changes
• Updated wire numbering standards
• Report format updates
• New schematic page requirements
• New design rules, plus validation behaviour
• Manufacturer parts library changes
• Updated project configurations
Without refreshed templates, engineers will keep using older conventions, and the outcome becomes inconsistent design and nobody wants that.
Benefits of Maintaining Updated Project Templates
Consistent Documentation
Every new project follows the most current company standards, and the same documentation habits.
Improved Productivity
Engineers can begin faster because they leverage preconfigured settings and a standardized project layout, instead of rebuilding everything manually.
Reduced Errors
When templates stay current, approved configurations and standards are applied correctly from the start, so fewer mistakes end up slipping into the build.
Simplified Training
New users can jump into projects with confidence, because the template already deals with the heavy setup and settings in advance. It feels like you don’t have to worry too much at the beginning, which is kind of the point.
Steps to Tweak an Existing Project Template
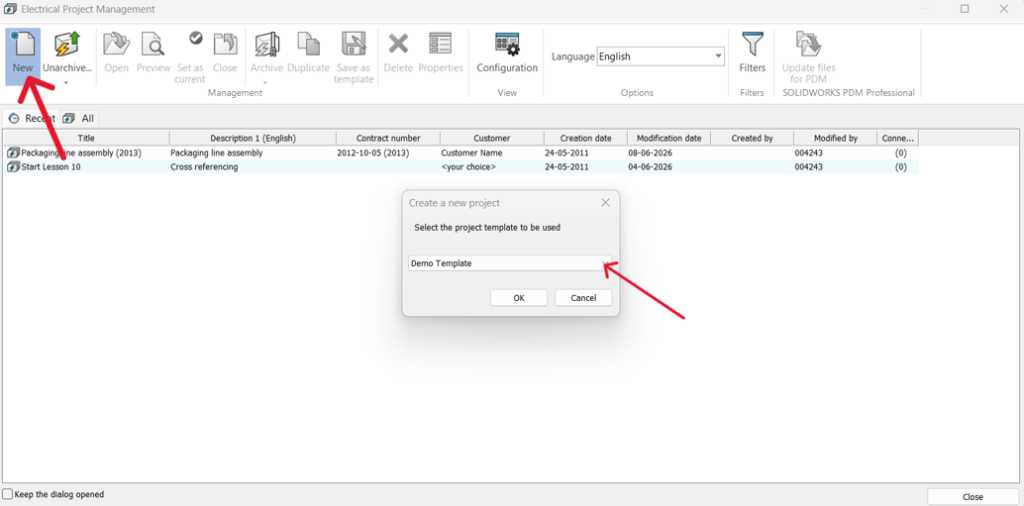
Step 1: Begin a New Project Using the Existing Template
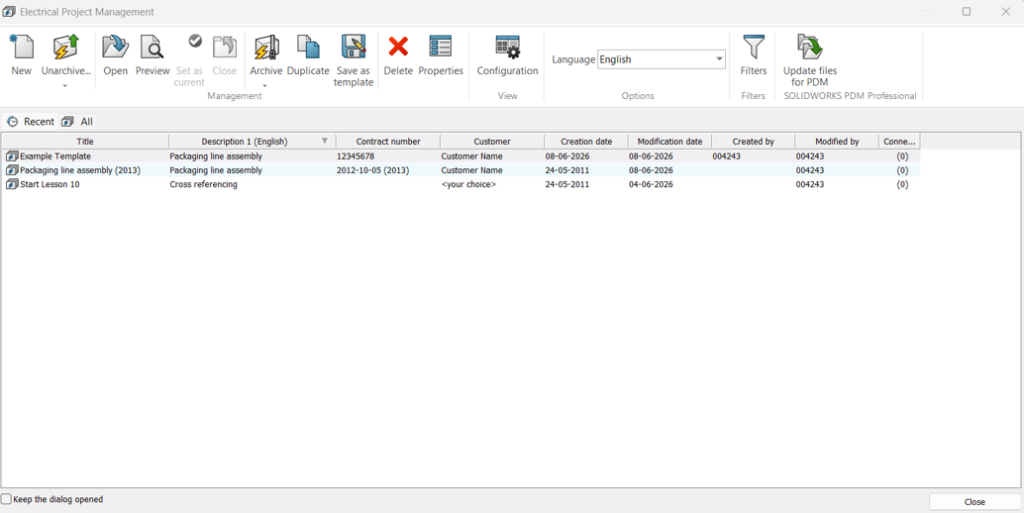
Open the Electrical Project Management window and click on New. To do this you need to select an existing project template you want to update. For instance choose the sample Template, then click OK. A new project window will open, you’ll be prompted to enter all the required details to create the project. After that you can verify the settings.
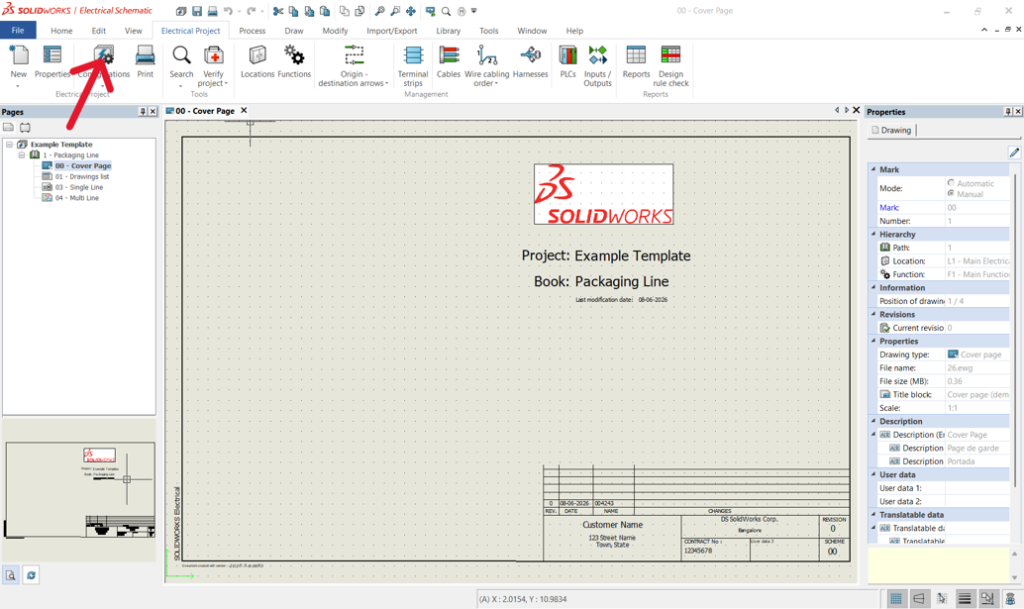
Step 2: Go to the Configuration Window
Next you need to reach the Configuration settings. Open the project in SOLIDWORKS Electrical go to the Electrical Project tab, and click on Configurations. This section contains all the project standards, numbering logic, title blocks and libraries that shape how the template behaves.
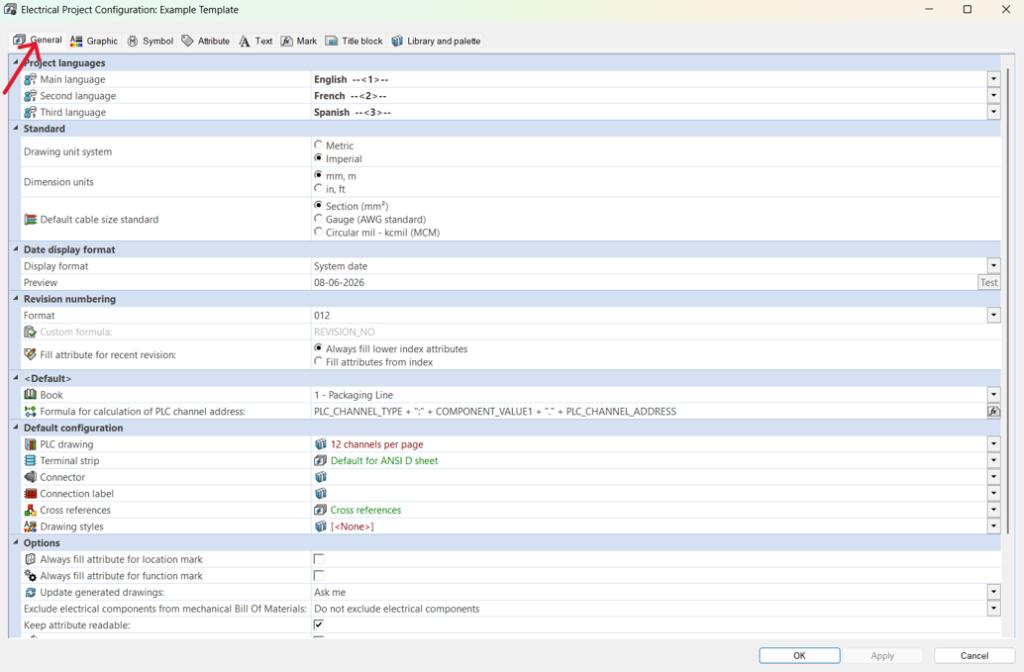
Step 3: Check and Adjust General Project Settings
Now you are inside the Project Configuration dialog. Here you can see the General settings, like which language to use, which measurement units to use, and how drawings should be arranged. Update these options so they fit your current company rules and the way you design things day to day.
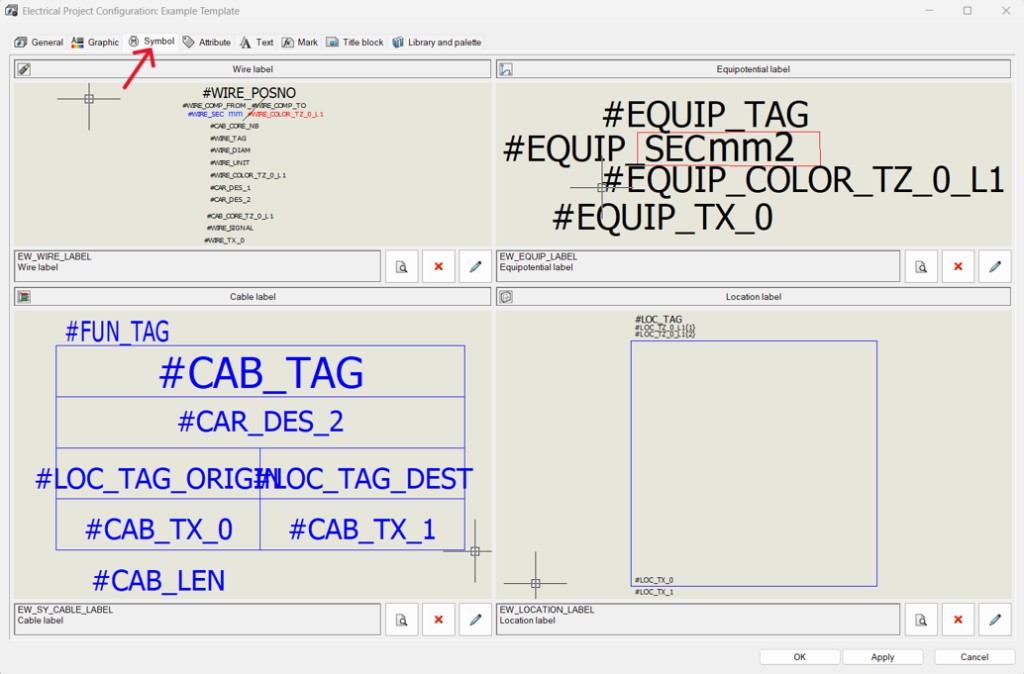
Step 4: Change Graphical Labels and How Symbols Show Up
Go to the Symbol tab and review, then adjust the graphical items like wire labels, cable labels, equipotential labels, and location labels. These settings steer how details appear across schematic drawings, and they also help keep things consistent for any future project generated from this project template.
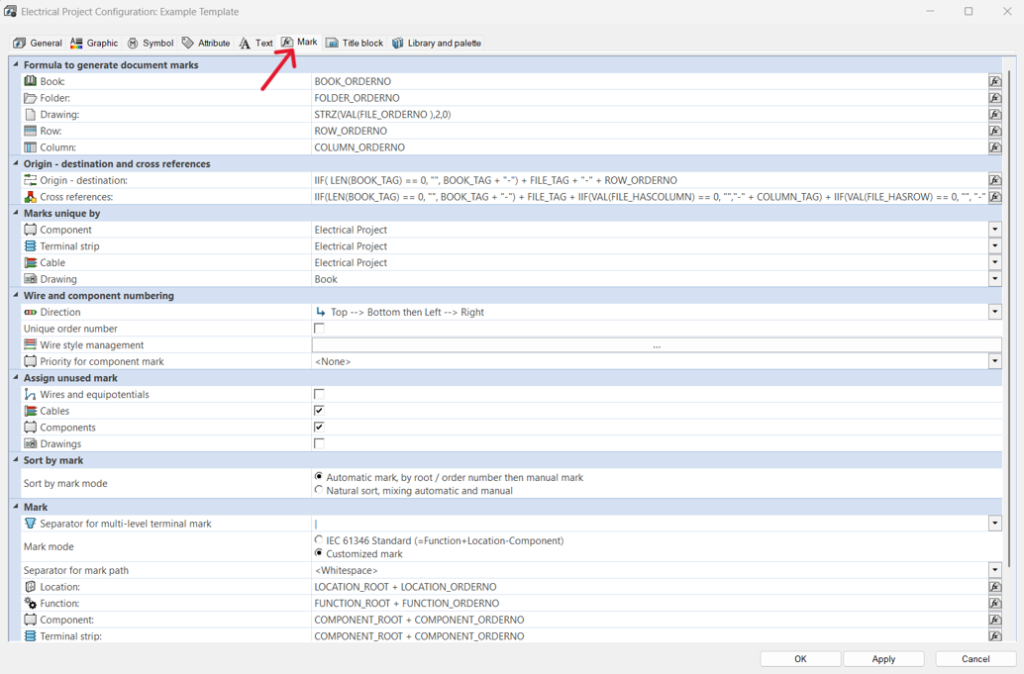
Step 5: Update Marking and Cross-Reference Logic
Open the Mark tab to set component numbering, wire numbering, cross-reference formatting, and device marking rules. This step is important because company naming rules or the numbering standards have shifted, so they also need to be applied automatically to upcoming projects or whatever comes next.
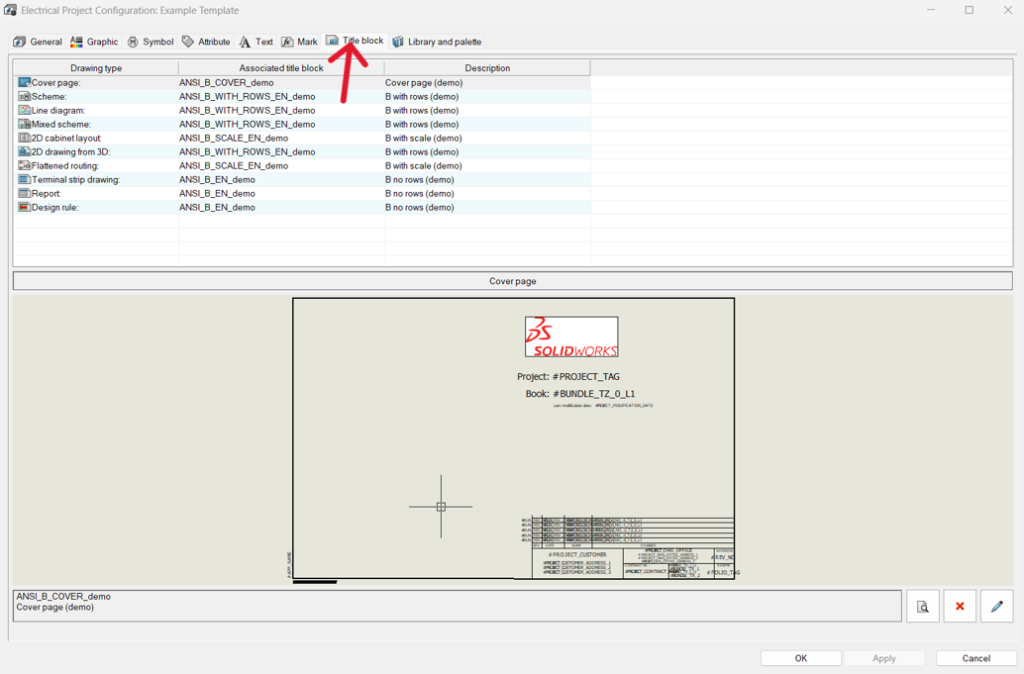
Step 6: Review and Update Title Blocks
Go to the Title Block tab, then check the title blocks connected with each drawing type. It’s kind of the right place to swap in company logos, revision tables, client info fields, and document layouts. Just make sure your title blocks look exactly like your company standards.
Step 7: Update libraries and palettes
In the Library and Palette tab, go through the available libraries symbol collections, manufacturer parts, cable references, and palettes that come with the project template. Keeping these resources current ensures that designers can grab the newest approved components and the company-standard symbols, pretty quickly, as you’d expect.

Step 8: Push Project Data from Libraries
After you finish with your edits, head to Process > Update Data to open the setup wizard. This helps sync your template with the newest library information, so everything stays correct and ready for the next project you start.
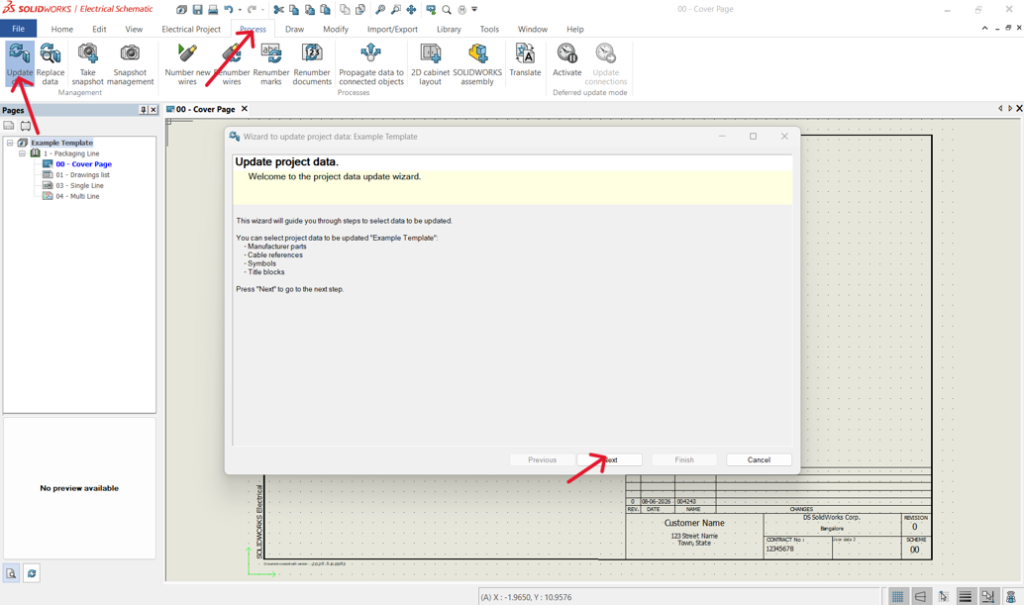
Step 9: Wrap up the Data Update Wizard
Follow the steps inside the Project Data Update Wizard.
* Update the project elements that are required.
* Click Finish.
Once the update process is done, confirm that all symbols, title blocks, manufacturer parts and references were refreshed properly. That check is a kind of safeguard, so older library info does not quietly sneak into future work.
Step 10: Save the Modified Project as a Template
Go back to the Electrical Project Management window, then select the updated project. When everything is done, close the customized project, and click Save as Template. That action creates a new template, with all the changes you put in already. So when you start a project, it will use the new settings.

Note: The save as template doesn’t work until and unless you close the current customized project template.
Step 11: Check Your New Template
When you are done, make sure the new template shows up in your project list. It’s a good idea to begin a quick test project, with it, just to confirm that all your settings, title blocks, numbering rules, and library updates work exactly how you expect.
Pro Tip: It is an idea to test the updated template before you share it with everyone. Open a test project. Look at that everything looks and works, the way you want, like the drawings, the reports and the title blocks.
Mistakes to Avoid When Creating Project Templates
- Modifying project templates without making backup copies
- Deploying untested project template changes
- Keeping multiple, untracked versions of the same project template
- Ignoring updates to reports and numbering schemes
- Failing to tell users about project template changes
Conclusion
Project Templates are pretty important for design work in SOLIDWORKS Electrical. If you keep them current, your team can work in a consistent way, and that’s usually what companies want.
Regular template maintenance also removes repeat setup tasks, helps stop expensive drawing mistakes, and lets your engineering team begin and finish projects much faster.
Frequently Asked Questions:
You make a project template by first creating a project, with all the things you need like title blocks, and symbol libraries. Once everything is how you want it, save it as a template, so you can reuse it later in other projects.
Customized templates are really handy. You do not have to do the same setup again, over and over. They also help reduce wrong turns, and keep the work consistent. Plus it makes collaboration smoother for teams.
A solid template should cover drawing formats, title blocks, numbering rules, symbol libraries, wire styles, and report configurations. It should also handle the project structure, and any regular settings you tend to use in your designs, without thinking too hard.
Yes, customized templates are great, because you can start working on the project sooner without burning time on initial setup. That usually means you reach completion faster, overall.
You should review templates from time to time, especially if your company changes its standards, or if project requirements shift. Most teams update their templates every 6 to 12 months, give or take.

Rohith H is a Solution Associate at Conceptia Konnect, based in Bengaluru, Karnataka. He specializes in SOLIDWORKS Electrical solutions and has experience in delivering electrical design solutions, project implementation, and technical consulting.