Short Shots in injection molding process
Short shots in injection molding occur when molten plastic cools and solidifies before the cavity fills all the way. Plastic parts are designed to have thin walls in order for the plastic to cool evenly and quickly within the mold. However, if the walls are too thin, the material could cool before reaching the end of the cavity. This is why short shots occur.
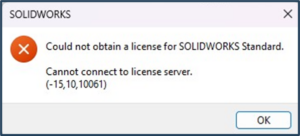
SOLIDWORKS Plastic Simulation software has the capability to predict short shots and can be fixed by geometry change or by increasing the injection pressure limit which oftentimes requires a larger injection molding machine.
In this blog, we will explore what is a short shot and how to predict one in the analysis process using SOLIDWORKS Plastic Simulation.
Below are the stages in process to detect short shots in plastic injection molding
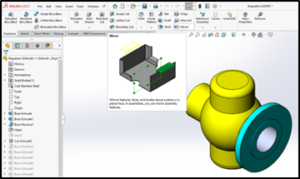
- Create a new study from SOLIDWORKS plastics command manager

2.Apply Material and Fill properties

Right-click Unit 1 and click Settings.
Click Apply/Edit Material and click Browse the database and select appropriate material.
The default values for Melt Temperature, mold Temperature and Temperature Criteria for Short Shots come from the material database and are material manufacturer recommendations. The Automatic value for Filling Time is estimated based off of the part volume as well as the Melt Temperature and Mold Temperature.

The fill stage is characterized by liquid resin being forced into a cavity under constant velocity. The Fill tab in the Injection Unit command, controls the parameters of the machine throughout the fill stage. These parameters include, Filling Time, Melt Temperature and Mold Temperature.
The software estimates the default Fill properties from the part volume and material manufacturer recommendations for melt and mold temperature.
Following are the parameters needs to be specified
- Melt Temperature – The temperature of the plastic as it enters the gate.
- Mold Temperature – The temperature of the mold walls during the fill stage
- Filling Time – The time required to fill the mold cavity with polymer melt.
- Injection Pressure Limit – The maximum possible pressure of the polymer at the injection location.
- Flow/Pack Switch Point -Determines the switch between the constant velocity fill stage and the constant pressure pack stage. Generally, this is kept at 99% to reduce flash
- Temperature Criteria for Short Shots – If the temperature of the melt front reaches the value set here, a short shot will automatically be detected.
- Flow Rate Profile Settings – Allows for a variable flow rate with time
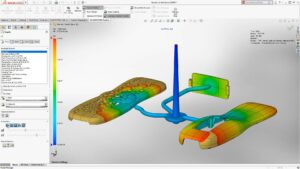
3. Once Material and other fill parameters are given, specify the injection location and mesh the model with default Curvature-based option.

Right click on boundary condition in study property manager to specify the injection location. Select sketch point or vertex of the model as injection location for shell analysis.

Specify the Curvature-based option and leave all the other parameters at their default values. Under Advance option, we can specify location where finer mesh to be create if needed.
Right click on flow and click run to start the analysis.


SOLIDWORKS Plastics brings easy-to-use injection molding simulation directly to the designers of plastic parts and injection molds, as well as advanced CAE analysis – –
Mahendra, Sr. Application Engineer , CAE
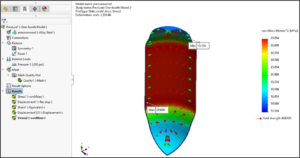
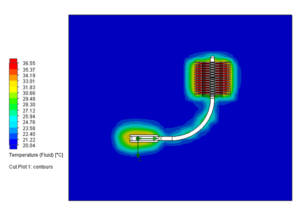
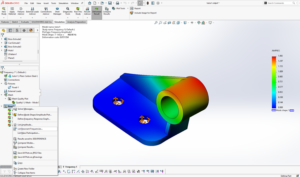
The Fill Time result shows that the flow stops well short of filling the mold resulting in a short shot. There are several ways to potentially fix a short shot, changing the fill time, the melt temperature, the mold temperature, the wall thickness of a part or the maximum injection pressure of the machine are all potential solutions for fixing short shots. But, will also increase cooling time and molded in stress. Therefore, it goes without saying that the positive effects of making mold changes should be balanced against the negative.
- By
- SHAMIL K U
- Application Engineer
- Conceptia Software Technologies Private Limited