Manually altering the material for each individual part or component within a large assembly can be quite annoying for CAD designers, particularly when dealing with thousands of components. SOLIDWORKS offers an advanced selection tool that enables users to change the material for all parts with a single click. With SOLIDWORKS, users can conveniently apply materials to part components via the “Edit Material” function in the FeatureManager design tree. However, the challenge arises when applying the same material to components within a large assembly consisting of several sub-assemblies. It is also noteworthy that the FeatureManager design tree does not include this command in the context of the SOLIDWORKS Assembly Environment.
Fortunately, you can apply the material to the components in the assembly as a bunch at once in SOLIDWORKS by following the methodologies shown below:
- FeatureManager Design Tree
- Select Command
1. FeatureManager Design Tree:
In FeatureManager Design Tree, Select the first component, and along with “Shift”, select the last component. You can also select the required components with “Ctrl”. Then right- click on the Feature Manager tree and expand the “Material” command and select “Edit Material”. You can also select the favorite materials.
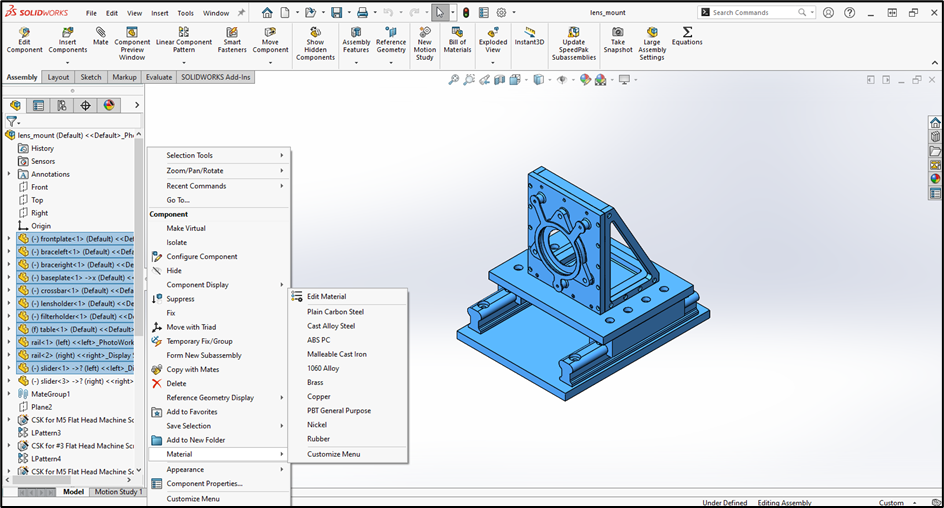
If the “Material” command is not visible in the list, select “Customize Menu” by scrolling down and enable the “Material” command.
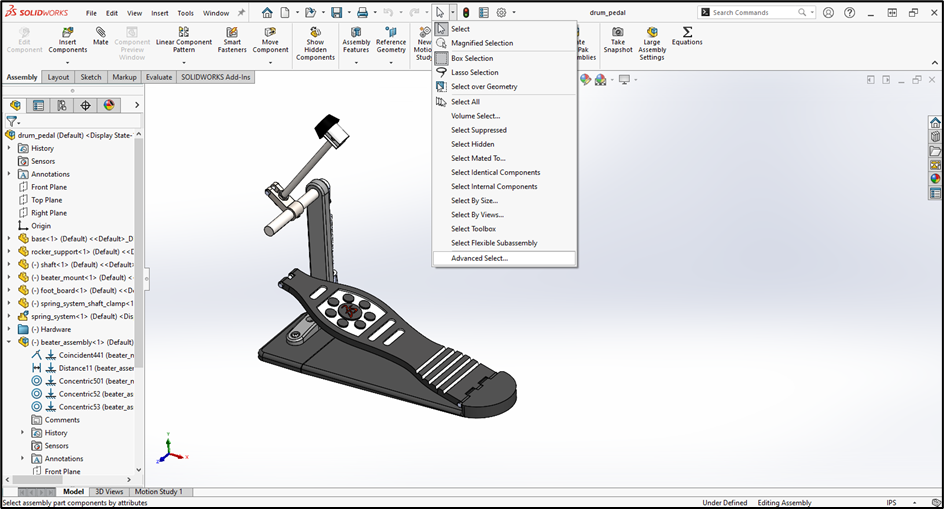
2. Select Command:
In case, if a top-level assembly has multiple sub-assemblies and you want to apply the material to all the parts without using the FeatureManager Design Tree, customized “Select” Command can come in handy.
To customize the command, navigate to “Select” command in the “Standard Toolbar” and select “Advanced Select” from the dropdown. The Advanced Component Selection window opens.
In “Define Search Criteria”, create a condition to apply the material as follows:
- Under the “Category1”, select “Document name — SW Special”.
- Under the “Condition”, select “Contains” and enter the value as sldprt.
After creating the condition, click “Apply” to select all the parts at once.
For the frequent utilization of the same functionality, you can set it as favorite. To achieve that, set the “Name of Search” as “Select Parts” and save the condition.
Then move to “Manage Searches” tab and set “Select Parts” as favorites by checking the box provided.
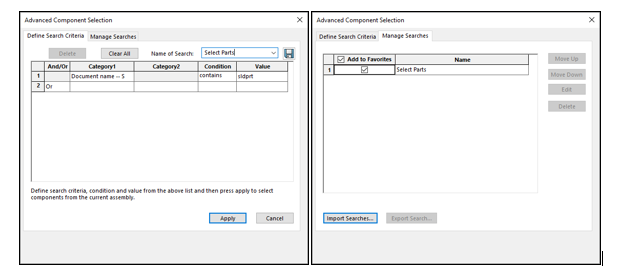
Find the “Select Parts” command under the “Select” command in the “Standard Toolbar” and apply the material to all the parts by using it.
In conclusion, applying material properties to assembly components in SOLIDWORKS is crucial for designers to evaluate mass, extract BOM & for simulation tasks etc. By following the above step-by-step guide allows users to assign specific materials to individual parts in assembly quickly and easily. Stay connected with the Conceptia KonnectBlogs for more useful tips concerning SOLIDWORKS and 3DEXPERIENCE Solutions. For any new SOLIDWORKS requirement mail at [email protected] or call to 9590506408.
Author Details:

Krithi S is a SOLIDWORKS certified Application Engineer working as an Online Support Associate at Conceptia Konnect, based in Bengaluru, Karnataka. Since September 2022, she is providing the remarkable technical support for SOLIDWORKS and associated to clients. With a strong focus on ensuring the customer satisfaction, Krithi is delivering exceptional support to SOLIDWORKS users by effectively addressing their issues and inquiries, thereby enhancing the user experience and enhancing their operational efficiency.
Read Few More SOLIDWORKS Blogs:
Different Ways to mirror the components in SOLIDWORKS
Are You Facing issues while trying to do Pack and Go of SOLIDWORKS files to Previous Versions?
How to change the scalability of Hidden Lines in SOLIDWORKS Drawings?